Microsoft Partner Branding Guidelines for Web Pages
Verify permissions, badges, logos, and claims before publishing partner pages—resolve unclear permissions or remove disputed assets.
Before I publish a partner page, I check 3 things: who provides the service, what Microsoft permits, and which claims I can support. Your company should be clearly named as the provider - not Microsoft.
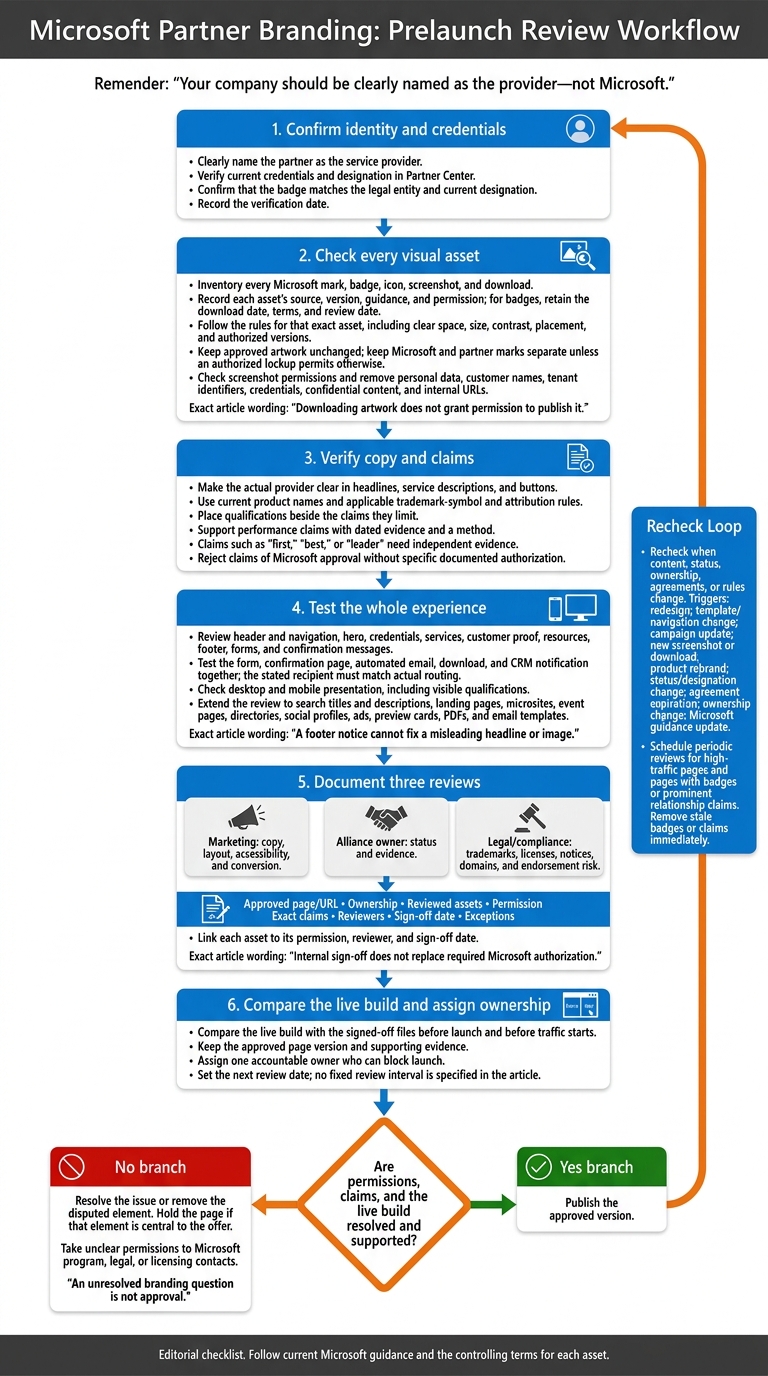
My prelaunch checklist covers:
- Identity and claims: Keep partner branding primary and verify current credentials in Partner Center.
- Visuals: Check permissions for each badge, logo, icon, and screenshot. Follow the rules for that exact asset.
- The whole experience: Review page copy, forms, downloads, ads, and social previews so they name the right provider and recipient.
- Approval and rechecks: Save permissions, supporting records, and sign-offs. Assign an owner and review again when content, status, or rules change.
Downloading artwork does not grant permission to publish it. My launch rule is simple: resolve unclear permissions before going live - or remove the disputed item.
Using Microsoft Badges, Logos, and Product Images
Once you’ve confirmed page ownership and claims, check every visual asset on the page.
Corporate trademarks identify Microsoft. Product marks identify Microsoft offerings. Partner badges show approved partner status. Downloading an image does not give you permission to use it on a website, in advertising, or in an app.
Use Current Partner Badges
Get badges and usage rules from Partner Center’s Logo Builder or another Microsoft-authorized source. Make sure the badge matches your legal entity and current designation. Record the source, download date, terms, and review date.
Follow the asset’s rules for clear space, size, contrast, and placement. Keep your company identity primary, and test badge readability on desktop and mobile, on both light and dark backgrounds.
Update or remove badges when your status changes. Don’t replace a badge with the Microsoft corporate logo unless you have separate permission.
Keep Approved Logo Artwork Unchanged
Keep the approved lockup intact, including the symbol and logotype. Before publishing, check licensing, minimum dimensions, clear space, and which positive or reverse versions are authorized.
Follow the rules for that specific asset. Corporate-logo rules don’t cover badges or product icons.
| Treatment | Permitted approach | Prohibited unless expressly authorized |
|---|---|---|
| Distortion | Scale proportionally. | Stretch, squash, skew, or change proportions. |
| Recoloring | Use supplied color or monochrome versions. | Apply custom colors, gradients, or filters. |
| Cropping | Show the complete approved artwork unless the asset guidance expressly allows another treatment. | Remove the symbol, logotype, or badge text. |
| Animation | Follow specific animation permissions. | Rotate, bounce, flash, or morph static artwork. |
| Shadows | Display supplied artwork without effects. | Add shadows, outlines, glows, or bevels. |
| Clear space | Preserve the asset’s required exclusion zone. | Crowd it with text, buttons, or other marks. |
| Contrast | Select the authorized positive or reverse version. | Use a low-contrast treatment. |
| Backgrounds | Use backgrounds allowed by the asset guidance. | Place artwork over distracting photos or patterns. |
| Combined marks | Keep Microsoft and partner marks separate, or use an authorized lockup. | Merge Microsoft and partner branding into a new logo. |
| Icons as logos | Use icons only where the guidance allows. | Use a product icon as your favicon, app icon, or service logo. |
Use this checklist alongside the asset’s controlling guidance - not as a replacement.
Review Product Icons and Screenshots
Treat screenshots and diagrams as brand claims, not decoration.
Check the guidance for each product you reference, including Microsoft 365, Azure, Dynamics 365, Power Platform, Copilot, and Teams. Permission to mention a product name doesn’t give you permission to use its icon.
Microsoft 365 guidance separates application icons from logos and advises against using app icons as decoration or logos. In diagrams, captions, and feature descriptions, label partner-built features separately from Microsoft functionality.
Review screenshots, captions, alt text, file names, videos, and PDFs together. Make sure interfaces are current and product names are accurate. Check screenshot permissions before cropping images or adding annotations.
Remove personal data, customer names, tenant identifiers, credentials, confidential content, and internal URLs. Check video audio and downloadable files, too. Neither should suggest that Microsoft built or operates a partner-owned feature.
Reviewing Page Copy, Sections, and Campaigns
After checking visuals, review the wording, claims, and destinations on every page. Apply the same partner-identity rule to every headline, button, and claim.
Write Accurate Headlines and Service Claims
Lead with the partner’s service or customer result, then name the Microsoft technology. Make the provider clear in headlines, service descriptions, and buttons. Don’t suggest that Microsoft delivers the service unless you have specific authorization.
Use current product names and follow the applicable trademark-symbol and attribution rules. Place qualifications beside the claims they limit - not behind a link or in the footer. Back performance claims with dated evidence and a method. Claims such as “first,” “best,” or “leader” need independent evidence. Record each claim separately:
| Page element | Factual claim | Brand risk | Required evidence | Reviewer decision |
|---|---|---|---|---|
| Hero headline | Partner services use Microsoft technology | Microsoft appears to provide the service | Service scope and delivery capability | Revise unclear wording |
| Credentials | Staff hold Microsoft certifications | Individual credentials do not prove company-wide certification | Current records and scope | Limit wording to documented scope |
| Customer proof | Service produced a measurable result | Result appears Microsoft-validated | Customer permission, dates, method, and source data | Include attribution and limitations |
| Call to action | Inquiry reaches the named provider | Button implies contact with Microsoft | Verified form routing | Clarify recipient |
| Approval claim | Microsoft approved the service | Implies formal endorsement | Specific documented authorization | Reject without authorization |
Check Every Page Section
Use this page map to check the full experience, including what users see after submitting a form:
| Page area | Required check |
|---|---|
| Header and navigation | Partner identity stays primary; logos remain separate, with the correct order and spacing. |
| Hero | Headline, imagery, and buttons identify the actual provider. |
| Credentials | Claims match current records and permitted scope. |
| Services | Partner-delivered work is clearly separate from Microsoft functionality. |
| Customer proof | Results have permission, dates, evidence, and attribution. |
| Resources | Downloads match approved claims and identify the content owner. |
| Footer | Required notices are visible and accurate. |
| Forms | Collection notice identifies the recipient, purpose, and relevant data use. |
| Confirmation messages | Thank-you pages and emails identify who responds and the next step. |
A footer notice cannot fix a misleading headline or image. On mobile, check logo order, spacing, relative size, contrast, and whether qualifications remain visible. Test the form, confirmation page, automated email, download, and CRM notification together. The stated recipient must match the actual routing.
Apply the same review to every channel that repeats or shortens the page message.
Check Social Profiles and Campaign Pages
Check search titles and descriptions, landing pages, microsites, event pages, directories, social profiles, ads, and preview cards against the website’s approved wording. Review each headline, image, audience, language, size, URL, and channel variant separately. Truncation or cropping can hide the partner identity.
For every destination, track publication locations, owners, approval dates, evidence, and recheck dates. After a status change, replace or remove affected claims across every destination before launch - including PDFs and email templates.
Save the claim log and approval notes for launch review.
Getting Branding Approval Before Launch
List Assets and Confirm Permissions
Once the page copy and visuals are approved, confirm exactly which assets will go live - and what permission covers each one.
Inventory every Microsoft mark, badge, icon, screenshot, download, and claim. Record its source, version, guidance, and permission. Keep descriptive references separate from asset use, and check whether an existing partner agreement, product-specific license, or other written permission covers the planned use.
Access to artwork is not permission to publish it. Resolve any uncertain uses before release.[3][8]
Review Pages and Document Approvals
Run three reviews. Marketing checks copy, layout, accessibility, and conversion. The alliance owner checks status and evidence. Legal/compliance checks trademarks, licenses, notices, domains, and endorsement risk. Together, these reviewers confirm who owns the page, who can make each claim, and who approved it.
Review the full rendered page, including navigation, footers, pop-ups, forms, PDFs, social cards, and downloads. Internal sign-off does not replace required Microsoft authorization. Document the rule that allows each use, or keep written authorization when required.[3][7]
Keep one approval record that links each asset to its permission, reviewer, and sign-off date.
| Record field | What to retain |
|---|---|
| Approved page/URL | Approved page files and publication URL |
| Ownership | Page owner and named legal entity |
| Reviewed assets | Links to the exact asset versions approved |
| Permission | Governing terms or written authorization |
| Exact claims | Approved wording and linked evidence |
| Reviewers | Marketing, alliance, and legal/compliance decisions |
| Sign-off date | Dated final approval |
| Exceptions | Unresolved issues and release conditions |
Run Launch Checks and Plan Rechecks
After approval, compare the live build with the signed-off files before launch and before traffic starts. Block publication if you find altered or combined logos, stretched or recolored artwork, product icons used as identity, unsupported endorsement language, misleading domains or titles, hidden qualifications, expired badges, or unreviewed social cards and downloads.
Recheck the page after a redesign, template/navigation change, campaign update, new screenshot or download, product rebrand, status/designation change, agreement expiration, ownership change, or Microsoft guidance update.
Schedule periodic reviews for high-traffic pages and pages with badges or prominent relationship claims. Remove stale badges or claims immediately.[3][5][6][9]
Make branding approval part of the GTM launch checklist - not an afterthought.
Include Branding Review in GTM Work
Keep branding approvals in the GTM record, but separate them from consulting, account planning, and seller outreach.
Conclusion: Finish Branding Checks Before Publishing
Before launch, base the publishing decision on evidence. Confirm who owns the page, check current permissions and credentials, make sure approved artwork hasn’t changed, and verify that claims have support. Check the claimed status in Partner Center - not an old deck, an internal assumption, or a third-party listing - and record the verification date.
Keep the approved page version and its supporting evidence. Assign one accountable owner who can block launch. Set the next review date, and require an immediate recheck whenever credentials, Microsoft guidance, or page content changes. Use the saved record as the baseline for future checks.
An unresolved branding question is not approval. Remove the disputed element, or hold the page if that element is central to the offer. Before publishing, take unclear permissions to Microsoft program, legal, or licensing contacts.
FAQs
How do I resolve conflicting Microsoft branding rules?
Start with the latest official documentation and align your messaging with Microsoft’s current priorities, such as Copilot, security, or Marketplace initiatives. Check solution designations and offer status in Partner Center against current requirements. If anything remains unclear, consult your alliance leader or escalate to operations for a final decision.
Barron Tech offers Microsoft go-to-market consulting to help partners address alignment challenges and keep messaging consistent and seller-ready across web assets and co-sell motions.
When do I need Microsoft’s written approval?
You need Microsoft’s written approval before using its brand assets on your web pages in ways that fall outside its standard, pre-approved guidelines. This generally covers non-standard use of its trademarks, logos, or proprietary messaging in marketing materials, co-branded web pages, or promotional campaigns.
Requirements can change. Before launch, check the latest Microsoft Partner Center branding portal to confirm whether your layout or content needs a compliance review.
Can I publish without Microsoft logos or badges?
Yes. Maintaining your partner status matters for marketplace visibility and enterprise funding. But the provided documentation doesn’t require specific logos or badges on your web pages [1]. If you use them, follow Microsoft’s branding requirements.
Barron Tech offers go-to-market consulting and Co-Sell Buddy to help with co-sell execution, seller engagement, and pipeline tracking - without relying solely on earning badges [2][3][4].