· 9 min read
Microsoft Trademark Rules: Social Name Guide
Checklist to verify permission and avoid implying official affiliation when using trademarked names in social account names.
In this article
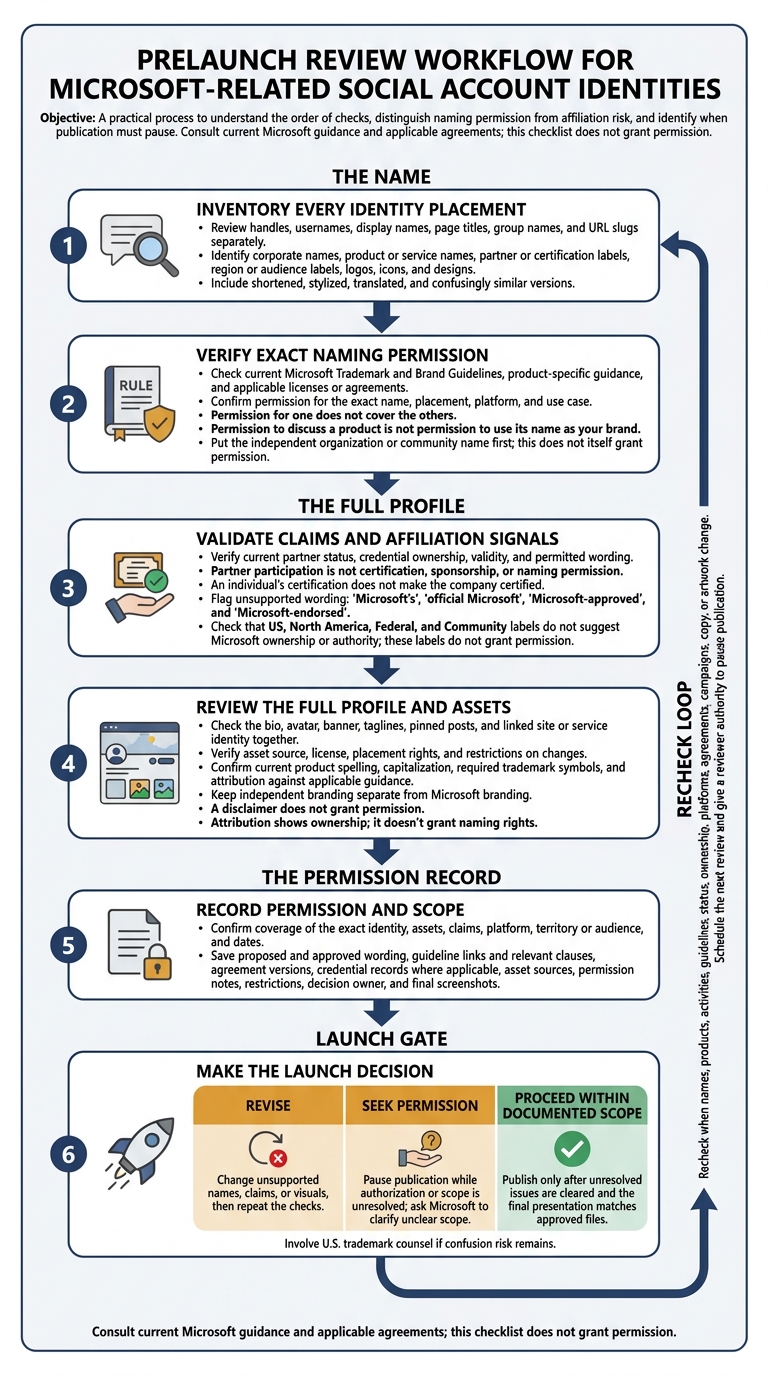
Before you put Microsoft or a product name in a social account name, check whether Microsoft permits that exact use. I start with 3 checks: the name, the full profile, and the permission record. Describing Microsoft-related work is not the same as using its marks as your identity.
For U.S. businesses, partners, and community groups, I recommend checking:
- Every name and placement: Review handles, page titles, group names, and URLs separately.
- Claims and visuals: Verify partner status, individual certifications, logos, and icons. Remove unsupported claims of Microsoft ownership or approval.
- Permission scope: Confirm that guidance or written permission covers your platform, assets, audience, and dates. A disclaimer does not grant permission.
- Launch records: Save the approved wording, artwork, sources, and decision. Pause if permission is unclear, and review again when the account or rules change.
Identify Microsoft Brand Assets in Names
Check more than exact word marks. Microsoft brand assets include names, logos, icons, and other identifying marks that may appear in handles, page titles, and community names.[1] Review shortened, stylized, translated, and confusingly similar versions, too.
The goal: spot names and visuals that could suggest Microsoft ownership or approval.
| Name element | Naming risk | Required verification |
|---|---|---|
| Corporate name | Microsoft appears in the handle or title. | Check current guidelines and keep the independent organization’s name prominent. |
| Product or service name | The product name becomes the account or group identity. | Verify official spelling, product-specific rules, and permission for that placement. |
| Partner or certification label | The label may imply endorsement or authority. | Verify current status, credential ownership, validity, and permitted wording. |
| Region or audience label | The label may suggest an official regional or government channel. | Check the full name for implied Microsoft affiliation. |
| Logo, icon, or design | The asset may make the profile look Microsoft-owned. | Verify its source, license, placement rules, and restrictions on changes. |
Corporate, Product, and Service Names
Permission to discuss a product is not permission to use its name as your brand. That applies to pages, groups, and services. Altered spelling or Microsoft-like styling still requires review.[1]
Check the exact wording in each handle, page title, and group name. Review Microsoft, Microsoft Azure, Microsoft 365, and Microsoft Teams against current naming guidance.[1][3][5]
Logos and product icons require a separate permission check. An icon being available to download does not mean you can use it as a profile image. Some application icons are restricted to functional uses, not independent branding.[3][4]
Partner Status and Certification Claims
Partner participation is not certification, sponsorship, or naming permission. And an individual’s certification does not make the company certified.
Verify current program terms, applicable agreements, credential ownership, and validity. For badges, check Partner Center and the applicable Logo Builder terms. Claims of approval or official authority require specific written authorization.[1][6]
Region and Audience Labels
US, North America, Federal, and Community labels do not grant permission. Review the full name: could it suggest a Microsoft office, government channel, product community, or program administrator?
Put the independent organization or community name first. Describe its Microsoft focus in the bio only when that description is accurate and permitted.[1]
Check for Implied Microsoft Affiliation
Start with permission, not confusion. Microsoft generally restricts its brand assets in social account names and other business identifiers unless published guidance, a license, or an agreement specifically allows the use. A name that looks independent may still lack permission.[1]
Check each public-facing element separately.
| Profile element | Permission question | Potential affiliation signal | Recommended review action |
|---|---|---|---|
| Handle or username | Is this exact identity use allowed? | Wording suggesting official support or Microsoft ownership | Check permission for the handle itself; rename it if none applies. |
| Display name or page title | Does permission cover this placement? | A product name presented as the page owner | Review it separately from the handle. |
| Community or group name | Does community-specific permission apply? | Presentation suggesting a Microsoft-run group | Verify the applicable community rules before publishing. |
| Linked site or service name | Is the mark allowed in the address or offering name? | An address or service identity suggesting Microsoft control | Use an independent name unless specifically permitted. |
| Avatar and banner | Is this asset licensed for this use? | Corporate branding or apparent co-branding | Check asset and placement rights; remove artwork used without permission. |
| Bio, pinned posts, and claims | Is the stated relationship documented? | Approval, sponsorship, or authority claims | Match the wording to the exact agreement and permitted scope. |
Handles and Page Titles
Handles, display names, and URLs can suggest affiliation in different ways. Permission for one does not cover the others. Review each for wording that suggests an official product page, regional office, support desk, or approved partner channel. Changing the display name alone won’t fix a problematic handle.[1]
Community and Group Names
An independent discussion group does not automatically have permission to use Microsoft branding. Nonprofit status, volunteer leadership, and the word community do not grant naming rights. Look for express community-specific permission; an “independent” label is not a substitute.[1]
Ownership, Approval, and Official Status Claims
Flag “Microsoft’s,” “official Microsoft,” “Microsoft-approved,” and “Microsoft-endorsed.”
Remove unsupported claims of sponsorship, co-branding, program authority, or permission to speak for Microsoft.[1][7][8]
Bios, Images, Disclaimers, and Posts
Review the whole profile - not just its name. Check the bio, avatar, banner, and pinned posts. A disclaimer does not replace permission or automatically fix a misleading identity. Microsoft may allow limited descriptive uses in publication or event titles, but that permission does not automatically cover social handles, community names, product names, or domains.[2]
Verify Naming Permission Before Launch
Review Official Guidelines and Agreements
Check Microsoft’s Trademark and Brand Guidelines, product-specific guidance, and applicable agreements. Permission must cover the exact platform and use case. A campaign agreement doesn’t automatically cover a social identity.
Use this matrix to turn each rule into a launch decision.
| Proposed use | General-guideline status | Product-specific requirements | Permission question | Documentation needed |
|---|---|---|---|---|
| Product name in a social handle | Revise or seek permission if the handle suggests ownership, endorsement, or official status | Check product naming and relevant program rules | Does permission cover this exact handle and platform? | Guideline URL, relevant clause, written permission, final screenshot |
| Certification claim in a page title | Revise unless the exact claim and placement are supported | Verify current credentials and approved wording | Is the designation current and permitted in this title? | Credential records, program terms, approved wording |
| Product icon as profile image | Seek permission or replace the asset | Check icon licensing and artwork specifications | Does the license cover use as the account’s identity? | License, asset source, usage restrictions, artwork proof |
| Microsoft mark in a campaign asset | Proceed within documented scope only | Follow applicable requirements for social campaign assets | Are the channel, audience, placement, and dates covered? | Agreement, campaign brief, approved assets, dated sign-off |
Once you’ve checked permission, review the exact asset details before launch.
Verify Product Names, Attribution, and Assets
Confirm current product spelling, capitalization, required trademark symbols, and attribution against the applicable guidance. Use artwork you have permission to use, and follow restrictions on recoloring, distortion, animation, or combining marks.
Keep your independent brand separate from Microsoft branding. Attribution shows ownership; it doesn’t grant naming rights.
Document the Decision and Permission Scope
Save the proposed name, guideline links, agreement versions, permission notes, restrictions, decision owner, and final screenshots. Before launch, record one decision: revise, seek permission, or proceed within documented scope.
Don’t publish until unresolved issues are cleared. Ask Microsoft to clarify unclear scope, and involve U.S. trademark counsel if confusion risk remains. Recheck whenever names, activities, platforms, agreements, or guidance change.
Make the documented naming scope part of the launch workflow.
Add Name Checks to Partner Campaigns
Require a naming review before publishing LinkedIn identities, campaign pages, seller-facing communities, and co-sell materials. Give someone authority to pause publication and compare the final presentation with approved files. Require another review whenever copy, artwork, or account details change.
Conclusion: Social Name Review Checklist
Before launch, check the name itself first, then review the rest of the account.
- Names and handles: Check display names, handles, URL slugs, page titles, and group names for Microsoft marks. Remove uses that aren’t covered by guidance or written authorization.
- Products and services: Use current, complete product names. Keep descriptive references separate from your own brand and service identity.
- Status and audience: Verify partner and certification claims. Keep individual certifications separate from company claims, and remove unsupported “official” or “Microsoft-approved” wording. Make sure region and audience labels don’t suggest Microsoft owns or runs the account.
- Bios and visuals: Review avatars, banners, taglines, and pinned posts together. Neither wording nor imagery should imply Microsoft ownership, sponsorship, or approval.
- Permission record: Confirm that documented permission covers the exact identity, assets, claims, platform, territory, and dates.
- Future checks: Schedule the next review. Check again after changes to products, guidelines, status, ownership, platforms, or campaigns.
FAQs
How do I request permission for a Microsoft-related social name?
To use a Microsoft-related social name or branding outside pre-approved guidelines, get formal written authorization from Microsoft. Start by checking the latest Microsoft Partner Center branding portal to confirm whether a formal compliance review is required.
If official documentation doesn’t answer your question, contact your alliance leader or the appropriate operations contact for a final decision. Barron Tech’s Microsoft go-to-market consulting helps partner firms work through alignment and messaging requirements.
What should I do if my existing account name violates Microsoft’s rules?
Act now. Check your social profiles, directories, and campaign pages against Microsoft’s branding guidelines. Keep your company’s identity front and center. Before launch, replace or remove any content that violates those guidelines - including social cards, URLs, and preview templates.
Unsure whether a name or use is allowed? Ask your alliance leader or check official Microsoft documentation. If you can’t confirm permission, remove the item.
Can I keep my social name if my Microsoft partner status expires?
No - not if your social name or page title suggests you’re a current Microsoft partner. As soon as your status changes, update or remove any claims, badges, or branding that imply an active relationship.
Review all public-facing assets immediately, including social profiles, landing pages, and microsites. Make sure each reflects your current status without misrepresenting your relationship with Microsoft.